To rip music from a CD to your computer
After the songs have been ripped, you can find and play them in your library.
To rip music from a CD to your computer
- Check that you are connected to the Internet and then start the Player.
When you are connected to the Internet, the Player attempts to retrieve media information (such as the album and artist name) about the tracks being ripped from a Windows Media database that is maintained by Microsoft. The Player then adds the information to the files during ripping. If media information is incorrect or missing, you can add or edit it after ripping. For information about adding or editing media information, see Windows Media Player Help.
- (Optional) To select a different format or bit rate for the files that are created during ripping, click the arrow below the Rip tab, as shown in the following screen shot, and then make your selections from the Format and Bit Rate commands. For more information on these options, see Choosing a file format and Choosing a bit rate, below.

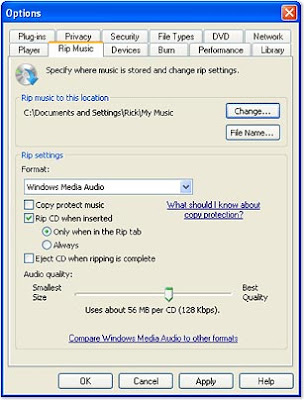
You can also change the default settings later on the Rip Music tab of the Optionsdialog box, which is accessible by clicking the arrow below the Rip tab, and then clicking More Options, as shown in the following screen shot.
- Insert an audio CD into the CD drive, and then click the Rip tab, as shown in the following screen shot.

By default, the Player begins ripping the CD automatically when you are in the Riptab or when you first switch to it after the CD was inserted. You can also choose to have ripping begin immediately upon inserting the CD, or you can turn off automatic ripping from the Rip Music tab of the Options dialog box. For information about changing these settings, see Windows Media Player Help.
Note that all songs are selected to be ripped if you have not previously ripped them.
- (Optional) As the Player begins to rip the CD, clear the check boxes next to any songs that you don't want to rip. Or, you can temporarily stop the rip process to make your selections. To do this, at the bottom of the List pane, click Stop Rip. (Partially ripped songs are not saved.)
Select the songs you want to rip, and then, at the bottom of the List pane, click Start Rip to restart ripping.
- (Optional) In some instances, you may be prompted to manually add missing media information after ripping has completed. For information about adding or editing media information, see Windows Media Player Help.
After the songs have been ripped, you can find and play them in your library.
Source – Windows media player - microsoft
I think it can be done in other media player version also. Like, in the Windows XP version, from the Copy CD option.
ReplyDeleteThanks,
ReplyDeleteI think we can be do in windows media player 10, If you have any other ideas please send to me or share...